Showing posts with label dessert. Show all posts

Wednesday, October 9, 2013

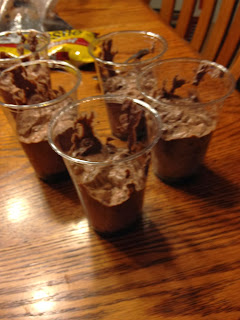
Boo Cups

Being that fall is my favorite season of the year, I decided to do some fun halloween crafts and treats, and this was one of the cutest I have seen, possibly ever! Here is the original recipe, courtesy of Pinterest. Please note that for this post, that I only made half of this recipe, because I wanted to give them a test run first, so the quantity listed here is for the full 15 cups.

Serves: 15
Prep Time: 15 minutes


Ingredients:
-3 1/2 cups cold milk
-2 packages of Jell-o chocolate instant pudding
-1 8oz tub of Cool Whip, divided
-20 Oreo cookies, crushed and divided
-1 package of mini semi-sweet chocolate chips
-9oz clear plastic cups or smaller 

1. In a large bowl, combine the milk and dry pudding mixes and stir well.


2. Add in half of the Cool Whip and half of the crushed Oreos, and mix well. Set mixture aside.


3. Crush the Oreos using a rolling pin or can of soup. You can crush the pieces as big or small as you would like.


4. Spread out the plastic cups. Add a small amount of the crushed Oreos to each cup (approximately 1/4).


5. Add in the pudding mixture to each cup (approximately 1/2 of the remaining space in the cup)


6. Add a final layer of crushed Oreos on top. You can fill all the way up to the top of the cup (I didn't only because these cups were BIG!)


7. In order to be able to pipe the Cool Whip on top in a ghost-y fashion, put Cool Whip in a Ziplock bag and cut the corner of the bag off. Then, pipe Cool Whip making a circle about the size of a golf ball and spiraling smaller circles on top until a ghost shape is made.


8. Lastly, gently place 2 mini chocolate chips next to each other in the Cool Whip ghost for eyes.


Ta-da! Pretty easy, huh?


Monday, July 8, 2013

4th of July Cake

I saw this idea on a random website and it looked really simple, so I attempted it. I made this for my cousin's annual 4th of July party. So cute!

Prep time: 10 minutes
Bake time: 30-35 minutes

Ingredients:
-cake mix (and water, vegetable oil, and 3 eggs)
-white frosting
-1 container of strawberries
-1 container of blueberries

1. Mix the cake mix, eggs, water, and oil together and bake in the oven according to the box directions.

Baked to perfection
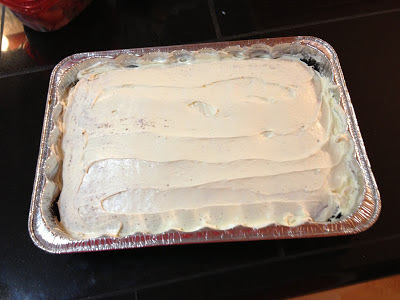
2. Allow the cake to cool for at least an hour. Frost with white frosting (I used cream cheese, but vanilla is fine, or any other white frosting flavor).

Frost that bad boy like your life depends on it!
3. Wash the blueberries and strawberries. Cut the strawberries in half length-wise, and the halves one more time length-wise.

4. Fill the upper left hand corner of the cake with rows of blueberries for the "stars." Then, lay the strawberries length-wise end to end across the cake for the "stripes."

Almost too good to eat. Almost.
Now, proudly display that masterpiece. Then eat it. Happy 4th of July!!

Baby, you're a firework!

Sunday, April 7, 2013

Mug Coffee Cake

Sometimes, you just like to have a treat or dessert that nobody else does. And when you do, you don't want to make an entire pie or cake and be responsible for eating all of it, or most of it going to waste. Unless, of course, you are Bruce Bogtrotter, from Matilda:


So, single serving desserts are magical, and that's where this comes in. I also found one for a chocolate lava cake, which I will post soon. Here is the original recipe.

Serves: 1
Prep time: 8 minutes
Cook time: 1 minute

Ingredients (cake batter):
-1 pinch of salt
-1/4 cup flour
-1 tbsp butter
-2 tbsp applesauce
-1/8 tsp baking powder
-2 tbsp sugar
-a few drops of vanilla extract

Ingredients (streusel topping)
-1 tbsp butter
-2 tbsp flour
-1 tbsp brown sugar
-1/4 tsp cinnamon

1. In a coffee mug, soften butter in the microwave for 8 seconds. Do not melt it, just soften it.


2. Mix the sugar in until well combined.


3. Mix in the salt, flour, applesauce, baking powder, and vanilla until just combined.


4. Flatten mixture out in the mug with the back of a spoon.

5. In a separate bowl, soften the butter for 8 seconds in the microwave. Mix in the flour, cinnamon, and brown sugar by pinching them together with your fingers.


6. Sprinkle the streusel mixture on top of the cake batter in the mug.


7. Microwave for 1 minute. Make sure not to overcook it! The topping should be just settled on the top. After 1 minute of cooking, cook in 10 second intervals until done.

Sunday, March 17, 2013

Green Velvet Cupcakes

I have always loved red velvet cupcakes, but never thought to make them in other colors! I got the recipe to make these festive shamrock green velvet cupcakes from none other than Martha Stewart. Here is the recipe for the cream cheese frosting also.


Serves: 24
Prep time: 20 minutes
Cook time: 20 minutes

Cake mix ingredients:
-2 1/2 cups cake flour (not self-rising)
-2 tablespoons cocoa powder
-1 tsp salt
-1 1/2 cups sugar
-1 1/2 cups vegetable oil
-2 large eggs
-green food coloring
-1 tsp pure vanilla extract
-1 cup buttermilk
-1 1/2 tsp baking soda
-2 tsp distilled white vinegar

Cream cheese frosting ingredients:
-12 oz cream cheese, room temperature
-2 sticks of unsalted butter, room temperature
-1 lb confectioner's sugar
-3/4 tsp pure vanilla extract

1. Preheat oven to 350 degrees.

2. Line a muffin pan with cupcake liners.

3. Mix together flour, cocoa powder, and salt in a medium bowl.


4. In a separate bowl, mix oil and sugar together. Add in eggs, vanilla, and food coloring. I used about 4 drops of green.

The color came out great!

5. Mix the sugar mixture into the flour mixture. Now, when I did this, this is what color the batter turned.


Damn you, cocoa powder! In an effort to save the color, I added in like 12 drops of food coloring.


Bleh! It was an ugly army green color! But, at least it was green. I didn't know how to rescue the color at this point, so I left it. I guess I need more practice with mixing colors!

6. In a small bowl, mix the baking soda and vinegar together. They will foam, so don't freak out. Then, add this mixture into the cake batter and mix thoroughly. I actually forgot this step and my first batch of cupcakes didn't rise beyond the liner. Whoops!

7. Spoon the cake batter into the cupcake liners so that it fills about 3/4 of the liner.


8. Bake in the oven for 20 minutes.

9. Remove from oven and allow to cool completely before frosting.


10. To make the frosting, mix well all frosting ingredients together: cream cheese, butter, sugar and vanilla. I didn't use a mixer, but you probably should to get the lumps out. Add in 3-4 drops of food coloring for a light green, or more if a deeper shade is desired.


11. Decorate cupcakes as desired. I made a little shamrock out of food coloring gel and sprinkled green sugar on the top of each one.


Happy St. Patrick's Day!

Monday, December 24, 2012

Cheesecake Dip

If you have seen my post on cherry cheese pie, this is basically that in dip form. It's a lot quicker to make, and a holiday hit at any party! Here is the original source.


Serves: 12
Prep time: 10 minutes

Ingredients:
-1 container of Cool Whip
-1 package of Jell-o no bake cheesecake mix
-1 can of cherry pie filling
-graham crackers

1. Pour entire container of Cool Whip into a large bowl.


2. Add in no bake cheesecake mix, and beat by hand until well blended. A mixer is also handy in this case for blending.


3. Spoon a few spoonfuls of mixture onto a plate, and drizzle cherry topping over it. Add graham crackers on the side, and set out for guests.


Thursday, December 6, 2012

Cranberry Apple Pie

This is a great holiday pie recipe, and it's unique! My aunt introduced this recipe to us one year at Thanksgiving, and I have been in loveh it ever since. For those of you who are not too keen on cranberries, the bitterness of them is actually balanced well by the sweetness of the apples. I must warn you though, cooking apples that you slice up yourself are always best. If you use the apple pie filling in a can, your pie will be a little bit, shall we say, liquidatious. I know this from lots of experience!  As a note, you will need 2 separate bowls: One for the pie filling, and 1 for the pie topping.


Serves: 8
Prep time: 20 minutes
Cook time: 40 minutes

Ingredients:
*Pie filling:
-9 inch pie crust
-3/4 cup packed brown sugar
-1/4 cup sugar
-1/3 cup flour (or more to thicken if liquidy, if you are using canned apples instead)
-1 tsp cinnamon
-2 tablespoons butter (softened, not melted)
-4 cups peeled and sliced cooking apples (approx. 5-6 apples, depending on size--Cortland and McIntosh are good ones) or 1 can of apple pie filling
-2 cups fresh cranberries

*Pie topping:
-1/2 cup quick cooking oats
-1/2 cup packed brown sugar
-1/4 cup softened butter

1. Heat oven to 425°.

2. Unroll pie crust into a pie tin. Pinch the edge all the way around.


3. Wash, peel, and slice apples into small chunks (I would say for me that translates to half the size of a golf ball) and put in large bowl, along with washed cranberries. Set aside.


4. Mix all ingredients (minus the fruit) well in a large mixing bowl. Butter may not mix as well if it is not softened, so break it up with a fork into small pieces.


5.Once mixed well, add in the apples and the cranberries slowly, and gently mix until all fruit is completely covered.


6. Put all ingredients into the pie crust and set aside. Now prepare pie topping.
 
 
7. Mix pie topping ingredients together in a mixing bowl. Again, butter may not mix well, so break up with fork into small pieces.


8. Once mixed well, sprinkle topping over entire pie until covered well.


9. Bake for 40 minutes. I burned the edges a little as you can see, but I learned that if you put foil around the edge, it's much less likely to burn.

Monday, June 4, 2012

Martha Stewart's Peanut Butter Cookies

Hello ladies and gentleman! Welcome to my Food Feature Blog (FFB). You will see many more of these as we go along on our gastronomical journey. Today's FFB is starring two wonderful friends of mine, Brent and Aaron. The recipe is courtesy of Martha Stewart!

Brent and Aaron
A very special thank you to them for sharing this great recipe, and for also helping the creative process as well. Six hands are better than two, after all, especially when photography in the kitchen is involved!


Serves: 12
Prep time: 10 minutes
Cook time: 18-20 minutes

Ingredients:
-8 tablespoons (1 stick) unsalted butter
-3/4 cup smooth/crunchy peanut butter (we used crunchy!)
-1/2 cup granulated sugar
-1/2 cup packed dark-brown sugar
-1 large egg
-1/2 teaspoon pure vanilla extract
-1 cup all-purpose flour
-3/4 teaspoon baking soda
-Extra sugar for topping
-Hershey's kisses

1. Preheat oven to 350°.

2. In a bowl mix butter, peanut butter, and both sugars together until light and fluffy. Add egg and vanilla, and mix until well combined.

3. In another medium mixing bowl, mix flour and baking soda together. Add to the butter mixture, and beat until well mixed.


4. Scoop out 2 tablespoons of dough, shape into a ball, and place on one of the prepared baking sheets. Repeat with remaining dough.

5. Add some sugar to a separate bowl. Take a drinking glass and dip the bottom part of it into the sugar. Then press on one of the cookie balls to add a sugary topping. Repeat until all cookies are flattened and sugar-coated.


6. Transfer to the oven, and bake until golden brown, approx. 18-20 minutes.


7. Unwrap a Hershey's kiss, and press it into the middle of the cookie after it is out of the oven, and before the cookie cools.


Enjoy! These cookies are really delish, especially when accompanied by a nice tall, icy cold glass of milk (I am from the dairy state, what did you expect?) Mmmmm!